Rick Curtis - Tutorial 10
Creating a File Upload Site - or Four Codes are better than One
I've been working on a site for users to be able to upload text files of articles and/or GIF or JPG files for inclusion in the site. I dind't want to use a COM-based like SA-FileUp or ASPUpload because of the hassles with the ISP. I needed a complete ASP solution so I pulled together Server Behaviors from some of the best--George Petrov (PureASP Upload), Tom Steeper (Preview File before Uploading), Owen Palmer (Dynamic File Include), and Tom Muck (Insert and Obtain ID). I want to thank all of them for their great Server Behaviors, each one an integral ingredient of the recipe. Thanks to a bunch of great chefs! (See below for how to get the Server Behaviors).
Since people are going to upload files to my site the first issue is to track the incoming files so I built a database. In my case SQL 7 but Access will work fine. Here's the basic design, use whatever fields you need to track submissions.
| Field Name | SQL Data Type | Access Data Type | Note |
| SubmitID | int | Autonumber | Primary Key |
| AuthorName | varchar (50) | Text | |
| Title | varchar(50) | Text | |
| DateEntered | Date | Date |
Add a New Submission - Submit.asp
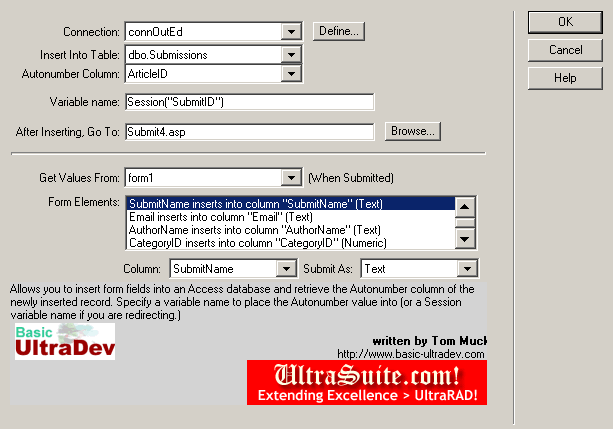
I'll presume that you already have a proper database connection set up. If you are using UD4 you don't have to do this for every page but can rely on the Connections.inc file. First create a form with the fields you need to insert a new submission into your database. Now apply Tom Muck's Insert and Obtain ID Server Behavior. (That's Code #1.) As you do the Insert the SubmitID value of the newly inserted record is returned to the page as a Session variable, let's call it SubmitID. This same behavior redirects us to the next page, Upload.asp.

Preview and Upload your Files - Upload.asp
On the Upload.asp page you first need to create a form which should look something like the one below. Drag a form onto the page and then drag the "Insert File Field" form element onto the page. Above that I add some text that explains what the user should do. Here it is. You'll notice that I have pulled the new SubmitID value in as a Session Variable and am using that as the base file. So if the SubmitID is 100 then all the files uploaded by this person should be named 100.something (100.txt, 100.gif, etc.) This means that I'll be able to tell which files come from which person and it will avoid overwriting files since people will use different names (this presumes of course that they actually follow the instructions).
Upload your File(s) - Your Submission Number is {Session.SubmitID}Your Submission Number is {Session.SubmitID}. This is the base name to use for any files you upload. So you will first have to rename your files before uploading so that we can connect your files with the proper submission. Your article or protocol must be named {Session.SubmitID}.txt. If you also need to submit multiple images they must be numbered sequentially from the base filename (ex. {Session.SubmitID}-1.gif, {Session.SubmitID}-2.gif). Only TXT, GIF or JPG image files may be uploaded. Files must have one of these file extensions.
|
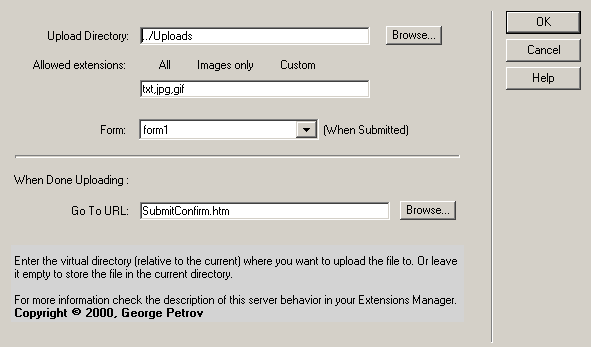
Now select the form and apply George Pretrov's PureAsp Upload behavior. (This is Code #2.) You'll see this dialog box where you can set various parameters. I wanted users to only be able to upload files with txt, gif or jpg extensions so I entered those as a comma-delimited list.

So now I have the code to do the actual file uploading. Then I saw Tom Steeper announce his new Preview File & Upload tutorial. (That's Code 3) and I thought, wow, that would be cool to let people view their files before uploading them. So jump to Tom's tutorial at http://members.prestige.net/ultradev/upload/upload.htm and download the files.
First take a look at Tom's choose_upload.asp page. You'll see two pieces of code. The first is Javascript code for opening a new page in a window. Here's the code. Just cut and paste the code into the the Upload.asp page just before the </head>.
<script language="JavaScript">
<!--
function T3_OpenWindow(url,name,features) {
window.open(url,name,features);
}
//--
</script>
</head>
The other piece of code is on the form and is attached to the button. Simply add a button to the form. Change the Action to None and then open the page in code view and add this code to the button.
onClick = "T3_OpenWindow('preview.asp?file1=' + document.form1.file1.value,'preview','scrollbars=yes,resizable=yes,width=400,height=200')">
This assumes that your form name = form1 and the name of the file field form element = file1. So the whole code for the Preview your File button looks like this.
<input type="button" name="Button" value="Preview" onClick = "T3_OpenWindow('preview.asp?file1=' + document.form1.file1.value,'preview','scrollbars=yes,resizable=yes,width=400,height=200')">
When you press the Browse button you can browse your hard disk and select a file which now appears in the file field form element. When you press the Preview your File button it opens up a new window Preview.asp. Now let's look at Tom Steeper's other file Preview.asp. In it he has code which takes the file location passed as a Request value from the Upload.asp page and evaluates the file path. If the file has a gif or jpg extension then he sets the source of an image to that filename and voila, the image shows in the new window.
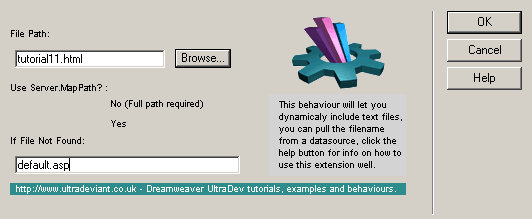
Well, since I am also taking txt files I thought it would be good for users to be able to view them as well since any browser can handle displaying straight text. Now I turned to Owen Palmer's Dynamic Include behavior (Finally, Code 4!) I applied this to the page and it adds a bunch of code as shown below. Here's the dialog box you'll see as you add the behavior. Select Server.MapPath and browse to select any old file (it won't matter). Then enter the name of a file to redirect to if no file is found. I selected nofile.htm. Again this doesn't matter since the code will never be called (but the extension requires it). The person is browsing a file on their own hard disk, if they select something they obviously found the file path!

Now you need to move this new code since it got inserted above Tom's Preview Code. So just move Owen's below Tom's. I've shown Tom's code in blue and Owen's in red. Find line 20 in Owen's code. It originally was OP_txtfile = Server.MapPath(Default.asp) since it was using Server.MapPath to find the location of a file. But we already know the file location since we passed it as a Request from the other page. In fact, the file location already exits in Tom's code in the variable FullPath=Request("file1"). So let's just replace the line above with OP_txtfile = FullPath
Now below that you'll see more of Tom's code in blue that calls up the image preview (<img src="<%= FullPath %>">). I copied his code (shown in purple) and changed it so that if looked for a txt file extension. Instead of setting the image source to Tom's Code I set the value in the table to Owen's dynamic include code shown in red <%=OP_incfile%>.
I also made a change in Tom's code so which originally had a redirect to the file path. Instead I have it display an error message if the file type is not one of the accepted file extensions. Remember, that you also may have set up a list of accepted file extensions in George's PureASP Upload behavior. You might want to allow someone to upload a ZIP file but not attempt to display it. So think about how these two features (file type uploading and file type previewing) should work in your application. Providing good instructions and error messages is important to avoid confusing the user.
|
1 |
<%@LANGUAGE="VBSCRIPT"%> if OP_fso.FileExists(OP_txtfile) then end if some other code on the page and then... <% IF Extension = "gif" OR Extension
= "jpg" THEN <!--RC Changes remove <img src="<%= FullPath %>"> and replace with <%= OP_incfile %>--> <% IF Extension = "txt" OR Extension
= "htm" OR Extension = "html" OR Extension =
"shtm" OR Extension = "shtml" THEN <!--RC Changes - redirect to Error Message if the wrong file type--> <% ELSE %> |
Before we are ready to rock we need to add one more piece of code. If you try to run the preview you'll get an HTTP error header is already written to error. To prevent this we need to add <% Response.buffer = true %> to the top of the page. This forces the entire page to be evaluated before anything is sent back.
That's it! Four great coders all providing the ingredients and one mixing bowl (me). You have an app that allows people to upload files, an preview different file types. With this code you can preview image types before uploading and also open other txt-based file types (even HTML and ASP) in the preview window.
Here's where you can get the Server Behaviors:
|
George Petrov (PureASP Upload)
|
http://www.udzone.com |
|
Tom Steeper (Preview File for Upload)
|
http://members.prestige.net/ultradev/ |
|
Owen Palmer (Dynamic File Include)
|
http://www.ultradeviant.co.uk/ |
|
Tom Muck (Insert and Obtain ID)
|
http://www.ultrasuite.com/us/ You need to purchase Jag Sidhu's UltraSuite Server Extensions. It's well worth it for all the time you'll save. |
You can download my changed version of Tom's RCPreview.asp just right click the link and select Save as...
Happy coding.
Macromedia and UltraDev are trademarks of the Macromedia Corporation.